
Create task
To begin working with tasks, we need to create them.
This can be done by accessing the create menu as shown.
There are two ways of creating a task:
- Create manually: Create a task manually by inputting all info needed, or possibly getting some of the info from a template
- Create from template: Using a template with predefined inputs, you only get to fill in a few fields
Create manually
When creating a task, whether manually or via template, there are different informations to take into account.
Let's take a look at them.
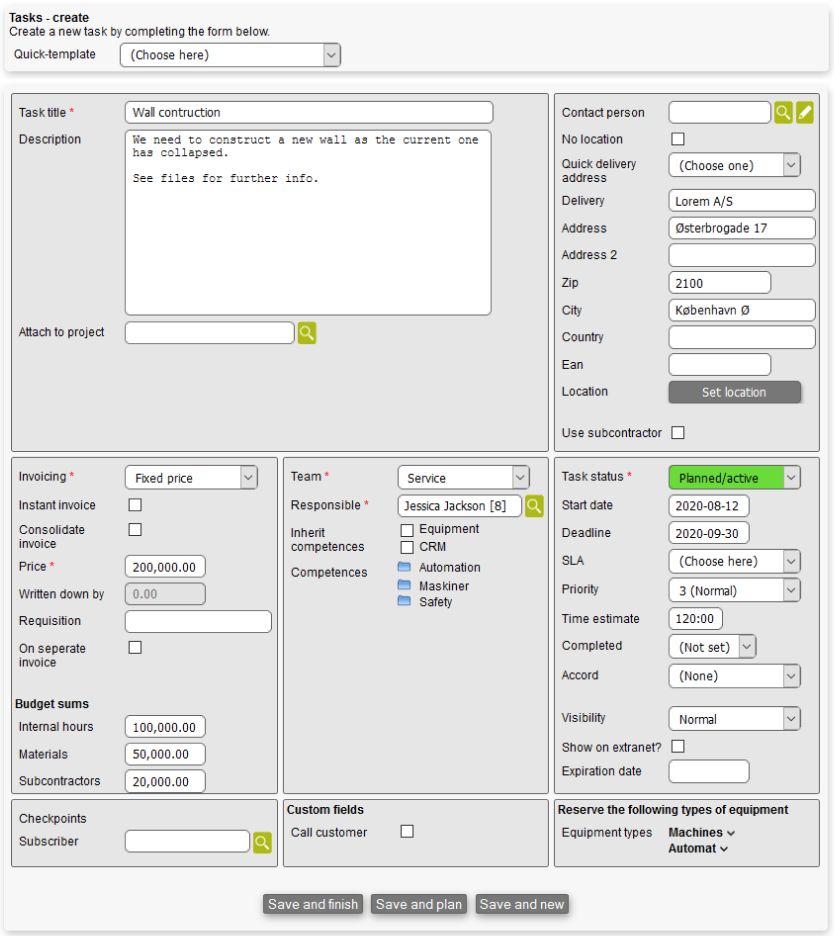
- Quick-template: If templates are created in advance, they can be chosen here, filling out the fields as necessary. For more on templates, continue reading below
- Task type: Task types are used to identify which type your tasks have, grouping those that share similar characteristics. There are a couple of types to choose from in Microbizz, with the most common one being Adhoc; a standard task, which doesn't need any planning in advance (e.g. as a repeated task). Learn more about task types on the following page
- Task title: The title of the task
- Description: The description of the task, this can be multiple lines of text; a option exists to allow you to use HTML in the description
- Attach to project: Here you can choose a project you want to attached the task to. For more on this, please refer to the Project module
- Contact person: Here you can choose a contact person for the task; this is typically a person at the associated company
- No location: If checked, the task has no geographically location
- Quick delivery address: Here you can choose an address you have marked for quick delivery in the Addresses tab in the CRM module
- Delivery: Add a company name and address the task must be delivered to
- Use subcontractor: If checked, a subcontractor is used, and you must therefore choose a company as such, and fill out any relevant information regarding it e.g. emails and addresses
- Invoicing: Here you can choose how the task should be invoiced; see Invoicing for details
- Instant invoice: If checked, the task is instantly invoiced every time work has been done, or products added and used for the task; see Invoicing for details
- Consolidate invoice: If checked, when invoicing the task, invoice lines that are similar to each other will be consolidated; see Invoicing for details
- Requisition: Add a requisition number usually used for later invoicing purposes towards the receiver; see Invoicing for details
- On seperate invoice: If checked, the invoice for the task is separated from any other invoice; See invoicing for details
- Budget sums: Here you can define the budget for the task. For more on this, please refer to the budget areas
- Team: Choose the team the task belongs to. For more on this, please refer to the User module
- Responsible: Choose a user that is responsible for the task and its completion
- Inherit competences: Here you can choose which module you want to inherit competences from
- Competences: Choose the competences needed for undertaking and completing the task. For more on this, please refer to the User module
- Task status: Choose the initial status for the task. For more on how to create statuses, please refer to this section
- Start date: The start date for when the task begins
- Deadline: The deadline for when the task has to be finished
- SLA: Abbreviation for Service Level Agreement. For more on this, please refer to how to configure your SLA
- Priority: The priority for the task. The choice can be from 1 to 5, with 1 referring to that the task has the highest priority, while 5 refers to that it has the lowest
- Time estimate: The time (hours) the task is estimated to take
- Completed: Choose how many percent of the task has been completed
- Accord: Choose one of the following options: See accord in this section
- Simple accord
- Running accord
- Visibility: Choose between one of the following ways regarding on the visibility of the task:
- Normal
- Hidden for others
- Show for everyone
- Show on extranet? If checked, the task will be visible on the extranet
- Subscriber: Choose users that want to be informed regarding the task
- Custom fields: If there are any, they are visible and usable. For more on how to create and edit custom fields, please refer to this section
- Equipment types: If you have created any equipment types, you can check those you wish are reserved for the task. For more on ho to create and edit equipment types, please refer to this section
- Employees: Any additional employees for the task are added here
Create from template
Creating a task from a template can be done in two ways:
- Quick template
- Implement template
Both types are setup through the templates menu.
Quick template
Quick template is used when creating a task manually, but instead of typing all the information manually, a template can be configured in advance.
Using a quick template should be used when some of the information suggested by the template are to be changed before the task creation is finished.
In the video below, the quick template is seen in action directly from the task creation.
When the template is used, and all the information in task are as preferred, the task can be saved as regular.
Implement template
Implementing a template is used when the task creation:
- Don't need any fields to be adjusted (making the creation quicker)
- When you would like to create multiple tasks at once
As seen below a template is implemented and very quickly two tasks are created. The start date field is used for calculating the task startdate and deadline; the templates may specify an offset from the start date.
It's possible to choose which tasks should be created, so if the template contains 2 tasks you may want to create only 1 of them.